
Many people have multiple computers at their residence, however they typically have only one of the computers connected to the Internet if they are using high speed Internet access such as Cable Modem or DSL. The other computer is cursed to spend its days stuck on dial-up. Since I believe this is morally wrong, I wrote this article.
Despite what some Internet Companies (ISPs) would like you to think, you can (with the right equipment) connect all your computers over your single Internet connection. You do not have to pay any extra monthly fees and you will not loose any Internet functionality.
No matter how you decide to share your connection, it is going to require that you provide wiring or wireless to connect each computer. This can be done many different ways. Over your existing phone wires (slow but cheap), over network wires (very fast), or over wireless. After you get your network up and running then you can decide what method to share your Internet connection.
Clue: Sharing your Internet connection also provides a basic firewall to protect your PCs from intrusion or attack from the Internet.
Using a DSL/Cable Router
This is my recommended method for sharing an Internet connection. You have more flexibility and options with a router (such as port forwarding). To use a router there is one requirement, the DSL or Cable-modem connection must be an Ethernet connection, it cannot be a USB device that plugs into your computer. If you do have a USB DSL modem or Cable Modem your only choice is to make your computer the router (this is called Microsoft Internet Connection Sharing).
MS Internet Connection Sharing
Microsoft's ICS allows you to share any type of Internet connection, even if you want to share a Dial-Up. Using Internet Connection Sharing, which is built in to Windows XP/Me, is one way to get the job done. It basically requires one computer to have the Internet connection and a separate network card that is used to share to the rest of the network.
The downfalls are that this computer must be left on at all times because all the other computers rely on it for their Internet access, this computer must be equipped with 2 network connections (one to the Internet and one to the internal network) and ICS does not provide many features that come with using a router.

Connecting Multiple Computers to Broadband
Broadband, or high-speed, Internet connection is what many users currently use in their home. Along with high-speed Internet, many users may also use a router to allow multiple computers to connect to the Internet. This post will describe how a router is used to connect multiple computers. To make it easier to understand, I will use where you live as a comparison to how your computer is connected to the Internet.
What is an IP Address?
IP addresses are a series of numbers in the form: nnn.nnn.nnn.nnn, where nnn is a one to three digit number. An IP address is unique to an individual computer on a network, similar to how your home has a unique address. For an Internet connection, an IP address is supplied by your Internet Service Provider (ISP). In some cases, your ISP may provide you with more than one IP address, which allows you to connect multiple computers. As you will see later, however, you can still connect multiple computers with a single IP address.
Connecting a Single Computer
Connecting a single computer to your high-speed Internet is very simple to do. Simply connect a network cable into your modem, and then into the network card in your computer. Your computer will then be assigned an IP address from your ISP. For example, if your ISP assigned you the IP address of 24.24.50.17, then your computer will have that IP address. The figure below shows the connection.

When you make a request to a server, such as for a Web page, the Web server knows which IP address made the request. The information is then sent through the Internet and back to your computer. This is similar to when someone sends you mail to your home. The address on the mail allows it to be delivered to your home and not somewhere else.
Connecting Multiple Computers
How can multiple computers connect if only one address is assigned? When you make a request for a Web page, how does it know which computer requested that page? Let’s take our home analogy one step further. Let’s say instead of living in a house, you live in an apartment. When someone sends you mail, they not only include your address but also an apartment number. This number is internal to your apartment building and every apartment has its own unique number. Similarly, multiple computers can connect to the Internet if they each had there own unique local IP address. This can be handled by a router.
A router is a piece of hardware that connects directly to the modem. Each computer is then connected to the router, instead of the modem. Now instead of your computer having the IP address supplied by your ISP, your router now is assigned that IP address. This is similar to your router acting as the apartment building.
The beauty of a router is that it can assign its own local IP addresses. When you connect a computer to the router it now receives one of the IP addresses assigned by your router, similar to how each apartment has it’s own number. Now when you make a request for a Web page, the request is sent using the same ISP address, but this time it is assigned to the router. When the Web page is returned, the router receives the request, and sends it locally to the computer that requested the page.
The router also has its own local address that is similar to the local IP addresses of the computers. So now the router has two addresses assigned to it: an external one provided by your ISP, and a local one provided by it. This allows the router to connect to both the Internet and the local network. The figure below shows how the router and computers are connected, and the IP address assignment.
Note: The 192.168.xxx.xxx address are special IP addresses reserved for Local Area Networks (LANs).

Managing a FTP or Web Server on Your Network
Let’s take a look at this scenario. You have a router connecting multiple computers to the Internet. But now you want to create a FTP or Web server. No problem. You setup the necessary software on a computer on your network, told someone outside your network the local IP address of your FTP server and they try to connect. They then discover that they can’t connect. Why? Its similar to someone mailing something to you by just specifying your apartment number and no address.
The IP address assigned to your computer is local to your network. You can connect to that computer from within your network, but not from the Internet. You will need to use your ISP-assigned IP address (the one assigned to your router) to have someone from the Internet connect to your FTP server. The problem is that your router is assigned that IP and not your computer, and since an IP address must be unique, how can two computers have the same IP? The answer: they can’t, but they don’t need to.
Routers have the ability to forward information on a port to a specific computer. A port is a numbered channel that data can be sent through on a network. You cannot physically see it as it is a virtual channel used extensively in networking for sending/receiving data. For FTP servers the default port is 21; however another port can be used.
Open your router setup and look for the port forwarding option. Specify the internal IP address of your FTP server and the port number and then save that information. Now when a user tries to access your FTP site, they must use the ISP IP address that is assigned to your router. The router will then notice that the data is being sent on port 21 and then forward it automatically to your FTP server. A Web server can be setup the same way, but its default port is usually 80. The figure below shows the router with the assigned IP address of 24.24.50.17, and the FTP server with the local address 192.168.1.101.

Note: By default a router will dynamically assign IP addresses to the computers connected to it. This means that the first computer to connect to the router will get the first available IP address, and the next will get the second, and so on. If you manage an FTP server, it may be easier to assign a static IP address to the computers to ensure that the FTP server always has the same IP address.
Summary
This post described how to connect one or more computers to one Internet connection. It is important to remember the following:
If you have one computer connected directly to the modem, then that computer will be assigned the IP address from your ISP.
When using a router, the the router will be assigned the IP address from your ISP. Any computers connected to the router will be assigned a local address by the router.
A router will have the ISP IP address and a local IP address. This allows it to connect to both the Internet and your network.
When setting up a computer as a FTP, Web, or other server to communicate over the Internet, it is important to use the router’s IP address to access your server. You will then need to forward the necessary port to your server.
What is an IP Address?
IP addresses are a series of numbers in the form: nnn.nnn.nnn.nnn, where nnn is a one to three digit number. An IP address is unique to an individual computer on a network, similar to how your home has a unique address. For an Internet connection, an IP address is supplied by your Internet Service Provider (ISP). In some cases, your ISP may provide you with more than one IP address, which allows you to connect multiple computers. As you will see later, however, you can still connect multiple computers with a single IP address.
Connecting a Single Computer
Connecting a single computer to your high-speed Internet is very simple to do. Simply connect a network cable into your modem, and then into the network card in your computer. Your computer will then be assigned an IP address from your ISP. For example, if your ISP assigned you the IP address of 24.24.50.17, then your computer will have that IP address. The figure below shows the connection.
When you make a request to a server, such as for a Web page, the Web server knows which IP address made the request. The information is then sent through the Internet and back to your computer. This is similar to when someone sends you mail to your home. The address on the mail allows it to be delivered to your home and not somewhere else.
Connecting Multiple Computers
How can multiple computers connect if only one address is assigned? When you make a request for a Web page, how does it know which computer requested that page? Let’s take our home analogy one step further. Let’s say instead of living in a house, you live in an apartment. When someone sends you mail, they not only include your address but also an apartment number. This number is internal to your apartment building and every apartment has its own unique number. Similarly, multiple computers can connect to the Internet if they each had there own unique local IP address. This can be handled by a router.
A router is a piece of hardware that connects directly to the modem. Each computer is then connected to the router, instead of the modem. Now instead of your computer having the IP address supplied by your ISP, your router now is assigned that IP address. This is similar to your router acting as the apartment building.
The beauty of a router is that it can assign its own local IP addresses. When you connect a computer to the router it now receives one of the IP addresses assigned by your router, similar to how each apartment has it’s own number. Now when you make a request for a Web page, the request is sent using the same ISP address, but this time it is assigned to the router. When the Web page is returned, the router receives the request, and sends it locally to the computer that requested the page.
The router also has its own local address that is similar to the local IP addresses of the computers. So now the router has two addresses assigned to it: an external one provided by your ISP, and a local one provided by it. This allows the router to connect to both the Internet and the local network. The figure below shows how the router and computers are connected, and the IP address assignment.
Note: The 192.168.xxx.xxx address are special IP addresses reserved for Local Area Networks (LANs).
Managing a FTP or Web Server on Your Network
Let’s take a look at this scenario. You have a router connecting multiple computers to the Internet. But now you want to create a FTP or Web server. No problem. You setup the necessary software on a computer on your network, told someone outside your network the local IP address of your FTP server and they try to connect. They then discover that they can’t connect. Why? Its similar to someone mailing something to you by just specifying your apartment number and no address.
The IP address assigned to your computer is local to your network. You can connect to that computer from within your network, but not from the Internet. You will need to use your ISP-assigned IP address (the one assigned to your router) to have someone from the Internet connect to your FTP server. The problem is that your router is assigned that IP and not your computer, and since an IP address must be unique, how can two computers have the same IP? The answer: they can’t, but they don’t need to.
Routers have the ability to forward information on a port to a specific computer. A port is a numbered channel that data can be sent through on a network. You cannot physically see it as it is a virtual channel used extensively in networking for sending/receiving data. For FTP servers the default port is 21; however another port can be used.
Open your router setup and look for the port forwarding option. Specify the internal IP address of your FTP server and the port number and then save that information. Now when a user tries to access your FTP site, they must use the ISP IP address that is assigned to your router. The router will then notice that the data is being sent on port 21 and then forward it automatically to your FTP server. A Web server can be setup the same way, but its default port is usually 80. The figure below shows the router with the assigned IP address of 24.24.50.17, and the FTP server with the local address 192.168.1.101.
Note: By default a router will dynamically assign IP addresses to the computers connected to it. This means that the first computer to connect to the router will get the first available IP address, and the next will get the second, and so on. If you manage an FTP server, it may be easier to assign a static IP address to the computers to ensure that the FTP server always has the same IP address.
Summary
This post described how to connect one or more computers to one Internet connection. It is important to remember the following:
If you have one computer connected directly to the modem, then that computer will be assigned the IP address from your ISP.
When using a router, the the router will be assigned the IP address from your ISP. Any computers connected to the router will be assigned a local address by the router.
A router will have the ISP IP address and a local IP address. This allows it to connect to both the Internet and your network.
When setting up a computer as a FTP, Web, or other server to communicate over the Internet, it is important to use the router’s IP address to access your server. You will then need to forward the necessary port to your server.
The CTDP Networking Guide
Introduction
This networking tutorial is primarily about TCP/IP network protocols and ethernet network architectures, but also briefly describes other protocol suites, network architectures, and other significant areas of networking. This networking tutorial is written for all audiences, even those with little or no networking experience. It explains in simple terms the way networks are put together, and how data packages are sent between networks and subnets along with how data is routed to the internet. This networking tutorial is broken into five main areas which are:
Basics - Explains the protocols and how they work together
Media - Describes the cabling and various media used to send data between multiple points of a network.
Architecture - Describes some popular network architectures. A network architecture refers to the physical layout (topology) of a network along with the physical transmission media (Type of wire, wireless, etc) and the data access method (OSI Layer 2). Includes ethernet, Token Ring, ARCnet, AppleTalk, and FDDI. This main area of the networking tutorial can and should be skipped by those learning networking and read later.
Other Transport Protocols - Describes IPX/SPX, NetBEUI, and more.
Functions - Explains some of the functionality of networking such as routing, firewalls and DNS.
Further Details - Gives information about some protocols not covered in the "Basics" section. In the future, it will include more information about packet fragmentation and re-assembly along with more details about UDP and especially TCP and TCP connections.
More Complex functions - Documents multicasting, dynamic routing, and network management
Applications - Documents how some of the applications work such as ping and traceroute. In the future, it will cover telnet, Rlogin, and FTP.
Other Concerns - Includes installing drivers, network operating systems, applications, wide area networks, backing up the network and troubleshooting the network.
References - Includes a reference list of terms, RFCs and recommended reading.
The reader may read this networking tutorial in any order, but for beginners, it would be best to read through from the beginning with the exception of sections 2 (media), 3 (architecture), and 4 (other). At some point, however, the reader should be able to break from the basics and read about routing and IP masquerading. There are no links to various reading material or software packages inside this networking tutorial, except under the references section. This is because it is more structured, and makes it easier to keep the networking tutorial current.
This networking tutorial will first talk about the network basics so the reader can get a good grasp of networking concepts. This should help the reader understand how each network protocol is used to perform networking. The reader will be able to understand why each protocol is needed, how it is used, and what other protocols it relies upon. This networking tutorial explains the data encapsulation techniques in preparation for transport along with some of the network protocols such as IP, TCP, UDP, ICMP, and IGMP. It explains how ARP and RARP support networking. In functional areas, such as routers, several examples are given so the user can get a grasp on how networking is done in their particular situation. This networking tutorial covers routing, IP masquerading, and firewalls and gives some explanation of how they work, how they are set up, and how and why they are used. Firewalls and the available packages are described, but how to set them up is left to other documentation specific to the operating system and the package. Application protocols such as FTP and Telnet are also briefly described. Networking terms are also explained and defined.
This networking tutorial explains the setup of networking functions using Linux Redhat version 6.1 as an operating system (OS) platform. This will apply to server functions such as routing and IP masquerading. For more documentation on setting up packages, read documentation on this web site and other locations specific to the operating system and the package. If you know how to set up other operating servers such as Windows NT, you can apply the information in this networking tutorial to help you understand how to configure services on that OS platform.
This networking tutorial was written because I perceived a need for a basic networking document to explain how these networking services work and how to set them up, with examples. It will help a novice to learn networking more quickly by explaining the big picture concerning how the system works together. I have seen much good networking documentation, but little that explains the theory along with practical setup and applications.
This networking tutorial is primarily about TCP/IP network protocols and ethernet network architectures, but also briefly describes other protocol suites, network architectures, and other significant areas of networking. This networking tutorial is written for all audiences, even those with little or no networking experience. It explains in simple terms the way networks are put together, and how data packages are sent between networks and subnets along with how data is routed to the internet. This networking tutorial is broken into five main areas which are:
Basics - Explains the protocols and how they work together
Media - Describes the cabling and various media used to send data between multiple points of a network.
Architecture - Describes some popular network architectures. A network architecture refers to the physical layout (topology) of a network along with the physical transmission media (Type of wire, wireless, etc) and the data access method (OSI Layer 2). Includes ethernet, Token Ring, ARCnet, AppleTalk, and FDDI. This main area of the networking tutorial can and should be skipped by those learning networking and read later.
Other Transport Protocols - Describes IPX/SPX, NetBEUI, and more.
Functions - Explains some of the functionality of networking such as routing, firewalls and DNS.
Further Details - Gives information about some protocols not covered in the "Basics" section. In the future, it will include more information about packet fragmentation and re-assembly along with more details about UDP and especially TCP and TCP connections.
More Complex functions - Documents multicasting, dynamic routing, and network management
Applications - Documents how some of the applications work such as ping and traceroute. In the future, it will cover telnet, Rlogin, and FTP.
Other Concerns - Includes installing drivers, network operating systems, applications, wide area networks, backing up the network and troubleshooting the network.
References - Includes a reference list of terms, RFCs and recommended reading.
The reader may read this networking tutorial in any order, but for beginners, it would be best to read through from the beginning with the exception of sections 2 (media), 3 (architecture), and 4 (other). At some point, however, the reader should be able to break from the basics and read about routing and IP masquerading. There are no links to various reading material or software packages inside this networking tutorial, except under the references section. This is because it is more structured, and makes it easier to keep the networking tutorial current.
This networking tutorial will first talk about the network basics so the reader can get a good grasp of networking concepts. This should help the reader understand how each network protocol is used to perform networking. The reader will be able to understand why each protocol is needed, how it is used, and what other protocols it relies upon. This networking tutorial explains the data encapsulation techniques in preparation for transport along with some of the network protocols such as IP, TCP, UDP, ICMP, and IGMP. It explains how ARP and RARP support networking. In functional areas, such as routers, several examples are given so the user can get a grasp on how networking is done in their particular situation. This networking tutorial covers routing, IP masquerading, and firewalls and gives some explanation of how they work, how they are set up, and how and why they are used. Firewalls and the available packages are described, but how to set them up is left to other documentation specific to the operating system and the package. Application protocols such as FTP and Telnet are also briefly described. Networking terms are also explained and defined.
This networking tutorial explains the setup of networking functions using Linux Redhat version 6.1 as an operating system (OS) platform. This will apply to server functions such as routing and IP masquerading. For more documentation on setting up packages, read documentation on this web site and other locations specific to the operating system and the package. If you know how to set up other operating servers such as Windows NT, you can apply the information in this networking tutorial to help you understand how to configure services on that OS platform.
This networking tutorial was written because I perceived a need for a basic networking document to explain how these networking services work and how to set them up, with examples. It will help a novice to learn networking more quickly by explaining the big picture concerning how the system works together. I have seen much good networking documentation, but little that explains the theory along with practical setup and applications.
How to Share Files and Folders between two Computers with Vista using Wireless or Wired Network?
This method is applicable both to wired and wireless network in Windows Vista.
First you need to access Network and Sharing Center. Go to Control Panel -> Network and Internet -> Network and Sharing Center. You can also access it by clicking the network icon on the tray from the taskbar and then click Network and Sharing Center.
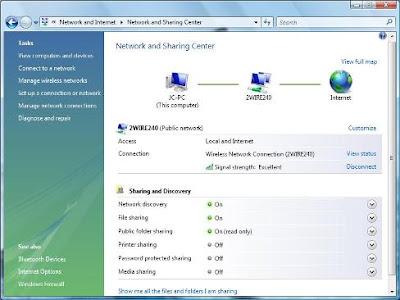
Here you will see the network you are connected currently and under that you find the title Sharing and Discovery. Turn on Network Discovery, File Sharing and public folder sharing. Make sure you do the same thing in the computer that you want to share files with.
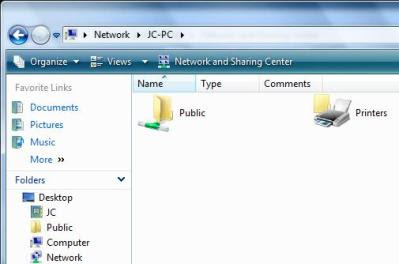
To see the computers available on your network, click Network from Start or click View Network Computers and Devices from Network and Internet at Control Panel. Here you will be able to see your computer and other computers that are connected to this network with public file sharing mode.
Now, all the files that are in the public user are shared across the network. You can see these folders and files from C drive/users/public (or from the drive where windows is installed). To share a file you can just copy and paste it under the folder public.
Share files and folders from anywhere by changing its properties:
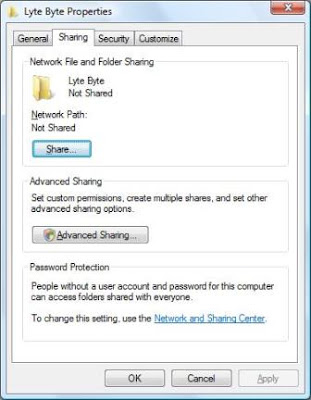
You can also share files and folders from anywhere by changing the sharing properties of the files and folders. To change its Properties, right click and click Properties. Go to Sharing tab and click Share.
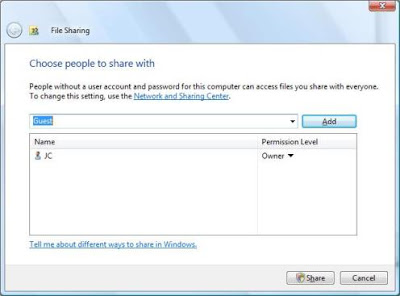
Click the drop down menu and select Guest and click Add. Click Share at the bottom of the window and it will close.
By default, the guest will have view access and if you want to give access to full access or change, click Advanced Sharing from the Sharing tab and click Permissions. Select Guest and choose the permission setting you would like to give and click Ok.
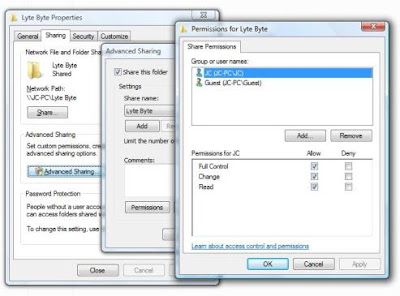
Now you will see that folder under your PC apart from public in Network folder. To stop sharing these files, Click Sharing from the properties, Click share and click stop sharing.
Password Protection:
If you are sharing folders in a network where there are couple of computers and you would selectively share folders then you can opt for password protection. You can activate Password Protection from Network and Sharing Center. Now while accessing the shared folders from another computer, you need to use the User account and Password that is already there in your computer.
As a best practice, always turn off network discovery and file sharing after you are done with sharing.
Source: www.lytebyte.com
First you need to access Network and Sharing Center. Go to Control Panel -> Network and Internet -> Network and Sharing Center. You can also access it by clicking the network icon on the tray from the taskbar and then click Network and Sharing Center.

Here you will see the network you are connected currently and under that you find the title Sharing and Discovery. Turn on Network Discovery, File Sharing and public folder sharing. Make sure you do the same thing in the computer that you want to share files with.
To see the computers available on your network, click Network from Start or click View Network Computers and Devices from Network and Internet at Control Panel. Here you will be able to see your computer and other computers that are connected to this network with public file sharing mode.
Now, all the files that are in the public user are shared across the network. You can see these folders and files from C drive/users/public (or from the drive where windows is installed). To share a file you can just copy and paste it under the folder public.

Share files and folders from anywhere by changing its properties:
You can also share files and folders from anywhere by changing the sharing properties of the files and folders. To change its Properties, right click and click Properties. Go to Sharing tab and click Share.

Click the drop down menu and select Guest and click Add. Click Share at the bottom of the window and it will close.

By default, the guest will have view access and if you want to give access to full access or change, click Advanced Sharing from the Sharing tab and click Permissions. Select Guest and choose the permission setting you would like to give and click Ok.

Now you will see that folder under your PC apart from public in Network folder. To stop sharing these files, Click Sharing from the properties, Click share and click stop sharing.
Password Protection:
If you are sharing folders in a network where there are couple of computers and you would selectively share folders then you can opt for password protection. You can activate Password Protection from Network and Sharing Center. Now while accessing the shared folders from another computer, you need to use the User account and Password that is already there in your computer.
As a best practice, always turn off network discovery and file sharing after you are done with sharing.
Source: www.lytebyte.com
How to share one Internet connection with another computer using Vista?
If you have more than one computer at home and have only one internet connection, you might be wondering how to use internet in both the computer. Let’s assume there are two computers A and B. Computer A runs on Windows Vista and Computer B runs on Windows XP.
Computer A is connected to Internet via cable, so this will be connected through a LAN card. Now to connect computer B, you will need another LAN card in computer A or if you want to connect to more than one computer, you will need a wired hub.
First let me explain how to connect two computers in LAN.
Step 1: In Vista, before doing this you should enable Sharing and Discovery. You can do that by going to Control Panel -> Network and Sharing Center. Under the section ‘Sharing and Discovery, enable Network discovery, File Sharing, Public folder sharing and others if you want to.
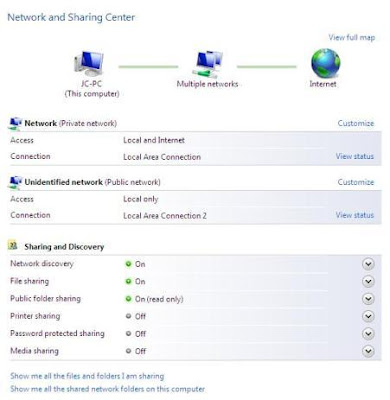
Here, first network represents connection to internet and second one the local connection with another computer.
Step 2: If your LAN card that is connecting to another computer is installed, it will be shown under Control Panel -> Network Connections.
Step 3: Right click that local area connection and click properties.
Step 4: Under the tab ‘Networking’, click the properties Internet Protocol Version 4 (TCP/IPv4).
Step 5: Click the radio button to ‘Use the following IP’ and give an IP address (For example, IP address: 192.168.0.1 and Subnet Mask: 255.255.255.0)
Step 6: Don’t give any other information, Click Ok and close everything.
Step 7: In computer B, make sure you enable the LAN card which is used to connect to computer ‘A’. Here you need not give any IP information as Computer ‘A’ will assign an IP address dynamically. If it’s not working make sure there are no IP assigned and change the properties to ‘Obtain an IP address automatically’.
Step 8: Test the connection by pinging. (You can do this by typing ping 192.168.0.1 or whichever is Compter ‘A’s IP in the comand prompt)
Sharing the Internet connection of computer ‘A’ with computer ‘B’:
Right click LAN card which is connected to Internet under Control Panel -> Network Connections and click ‘Sharing’ tab and enable both the options to share Internet. (Note: Unless there is another enabled LAN setting you will not be able to see the shared tab under properties)
Click Ok and close. This option is given by the Windows OS known as ICS (Internet Connection Sharing).
Now you can use Internet from both Computer A and Computer B from a single connection.
Source: www.lytebyte.com
Computer A is connected to Internet via cable, so this will be connected through a LAN card. Now to connect computer B, you will need another LAN card in computer A or if you want to connect to more than one computer, you will need a wired hub.
First let me explain how to connect two computers in LAN.
Step 1: In Vista, before doing this you should enable Sharing and Discovery. You can do that by going to Control Panel -> Network and Sharing Center. Under the section ‘Sharing and Discovery, enable Network discovery, File Sharing, Public folder sharing and others if you want to.

Here, first network represents connection to internet and second one the local connection with another computer.
Step 2: If your LAN card that is connecting to another computer is installed, it will be shown under Control Panel -> Network Connections.
Step 3: Right click that local area connection and click properties.
Step 4: Under the tab ‘Networking’, click the properties Internet Protocol Version 4 (TCP/IPv4).
Step 5: Click the radio button to ‘Use the following IP’ and give an IP address (For example, IP address: 192.168.0.1 and Subnet Mask: 255.255.255.0)
Step 6: Don’t give any other information, Click Ok and close everything.
Step 7: In computer B, make sure you enable the LAN card which is used to connect to computer ‘A’. Here you need not give any IP information as Computer ‘A’ will assign an IP address dynamically. If it’s not working make sure there are no IP assigned and change the properties to ‘Obtain an IP address automatically’.
Step 8: Test the connection by pinging. (You can do this by typing ping 192.168.0.1 or whichever is Compter ‘A’s IP in the comand prompt)
Sharing the Internet connection of computer ‘A’ with computer ‘B’:
Right click LAN card which is connected to Internet under Control Panel -> Network Connections and click ‘Sharing’ tab and enable both the options to share Internet. (Note: Unless there is another enabled LAN setting you will not be able to see the shared tab under properties)
Click Ok and close. This option is given by the Windows OS known as ICS (Internet Connection Sharing).
Now you can use Internet from both Computer A and Computer B from a single connection.
Source: www.lytebyte.com
Subscribe to:
Posts (Atom)